

You are not going to site to look at the site. You are going to collect the material for drawings you have not made yet. Those are different jobs, and only one of them can be done twice.
01Write the list from the drawings, not from the site
Before you go, write down the drawings you already know the project will need. A site plan. A long section. A context elevation. A materials board. Two or three of those are in the brief and the rest are obvious by week two.
Then work backwards from each one and write what it needs from you.
A section needs the levels change photographed square on, from far enough back to see where the ground starts and stops falling. A context elevation needs the buildings either side, straight on, from across the road, separately as well as together. A materials board needs close-ups at arm’s length of surfaces that are actually there — the brick, the render, the kerb — not a general view with a wall in it. A site plan needs the boundaries, all of them, including the one behind the hedge.
That is the whole method. Every line is a drawing waiting to happen, and a list built this way is short, specific and finishable in an afternoon. A list that says “photograph the site” is not a list.
Print it, or write it on paper. Phones die outdoors in November. Writing the list is one of the twelve habits in the Project Start Checklist, and it is the only one that has to be done before you leave the building.
In practice
Access, permission and not being an idiot about it. Many sites you are given are someone’s property. If the visit is arranged by the school, go on the arranged day — that is often the only day anyone has permission for. Going independently, stay on public land unless you have asked and been told yes, and photograph from the pavement rather than climbing anything. Nobody minds a student with a camera on the street; several people mind a student in their yard.
If the site is derelict or a working building site, the rules are not advisory. Do not go alone, tell someone where you are and when you will be back, wear hi-vis and proper boots on anything active, and do not enter a boarded-up building at all — floors, asbestos and the law are all against you, and the photograph is not worth it.
02The things everyone forgets
The shot list covers the drawings you have thought of. This list covers the ones you have not.
- The boundaries, and what is on the other side of them. Fences, party walls, the back of the neighbour.
- The backs of things. Every site has a side nobody photographs because it is ugly. It is usually where the servicing goes and always where a question gets asked.
- The approach. Walk in from the direction people actually arrive, not from where the bus dropped you, and photograph it as a sequence.
- The sky and the light. Photograph at the time of day your render is going to claim, or change the render.
Two more that are not photographs. Record thirty seconds of sound — traffic, a school at four o’clock, a flightpath — because you will describe the site in words at some point and nobody remembers a noise. And write down what a camera cannot take: the wind, which benches people sit on, where the sun was.
Then there is scale, the failure that survives all the way to the crit. A photograph of a wall is a photograph of a texture. A photograph of a wall with a door in it is a measurement. Put something known in every frame you will draw from — a door, a kerb, a parked car, a person — or hold your own tape measure open against the thing and take one extra shot.
03Three shots of everything, then the video
For anything that matters, take three photographs rather than one. It costs seconds and it is the difference between having a drawing and having a memory.
-
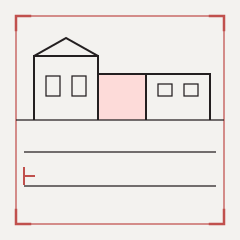 A — Wide context
From across the road
From the far corner, taking in the site and what stands next to it. This is what a context elevation and a site plan are drawn from. Take it from each approach, and hold the camera level rather than tilting it up.
-
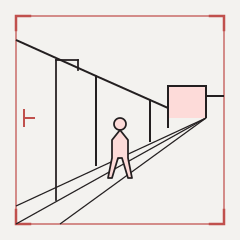 B — Eye level
Standing where a person walks
Camera at your own eye height, looking the way they look. It is what makes a visual with a person in it believable, and it is the one nobody takes because it feels like a boring photograph.
-
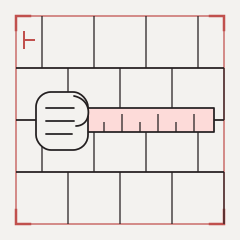 C — Close material
Arm’s length, square on
Flat light, one material filling the frame. Brick, render, timber, tarmac, kerb. These become the materials board, and they cannot be faked from a photograph found online.
Swipe →
Then the video, which is the cheapest insurance in the project. Walk the whole perimeter slowly with the camera running and say out loud what you are looking at as you pass — this is the north boundary, this is the neighbour’s extension, the ground drops from here. Thirty seconds of work, no editing. When week nine asks what was behind the fence, that file answers it, and the narration means you do not have to work out what you were pointing at.
Take more than you think you need. Storage is cheap and the second visit usually is not available.
04The half hour that evening
The visit is not finished when you leave the site. It is finished when the files are named and filed, the same evening, while you still remember what you were pointing at.
-
Before you go
Shot list printed. Access confirmed and permission checked. Phone and camera charged, storage cleared. Notebook, tape measure, something to write with that works in the rain. Tell someone where the site is and when you will be back.
-
On site, work the list, then stop working the list
Go through the list first, tick as you go, and do not leave until it is finished. Then put it away and walk the site once more with no agenda, camera running. The list gets you the drawings. The second walk gets you the thing you did not know to ask for.
-
The same evening, before anything else
Copy everything off the phone and the camera into the project folder — one folder for the whole project, from week one, which is check 05. Rename the files while the visit is fresh, because IMG_4471.JPG tells you nothing in November and 20260914_ORCHARD_site-north-boundary_v01.jpg tells you everything. That is check 08. Then write ten lines of notes into the same folder: what you saw, what surprised you, what you missed.
Those ten lines are worth as much as the photographs. They are the only record of what you thought on the day, and by week nine the photographs will have stopped reminding you. They are also, when a page in the portfolio template needs a paragraph about the site, that paragraph mostly already written.
Before the next visit, open the brief, write down the drawings the project needs, and turn each one into a line on the shot list. Ten minutes at a desk buys the photograph week nine is going to want.